


A site dedicated to discussion of these classic boats
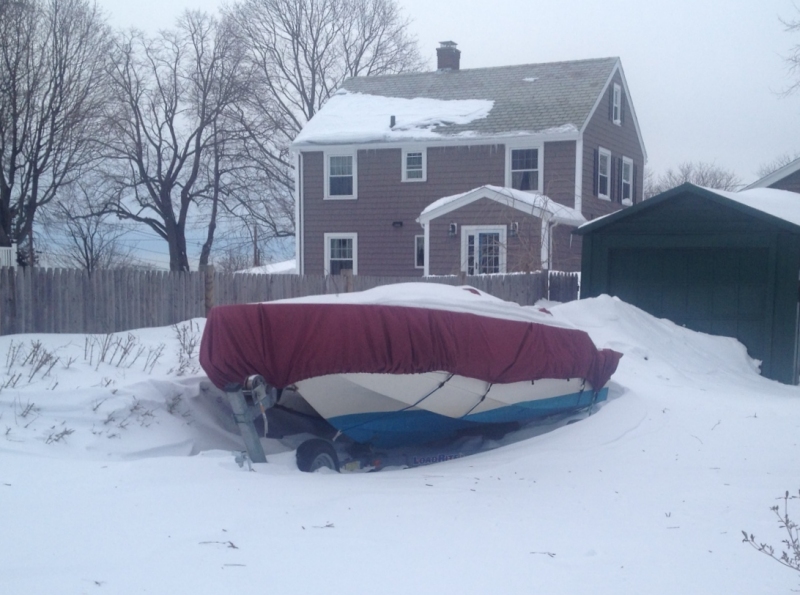 I haven’t had much opportunity to post in recent months–let alone do any work on the boat. Seatoad sits in the driveway under a mantle of snow and ice. this winter has been particularly harsh–over eight feet of snow in Boston and still a month to go until spring. A few weeks after Christmas I pulled off the cover long enough to lay a bunch of planks across the gunnels. Good thing or the snow would have collapsed the cover long ago.
This afternoon I finally got around to starting a preliminary spring to-do list for the boat. There’s a lot that needs doing.
The rest of the items are related–one way or another–to the repower I did last spring. While the new engine itself is great (a Honda 4 stroke) the work done by the service center was awful–sloppy and rushed despite taking six week. They even broke a few things on the boat in the process.
what I need to fix:
 Late last season I damaged the gears in the lower unit. The how and why is for another article. But it meant that this year I had to choose between repairing the engine (a 1995 Johnson) or replacing it. I opted for replacement, figuring then I could repair the Johnson at my leisure and either sell it or keep it as a backup.
The next question was new or used? I’m slow draw when it comes to spending money but after mulling it over, I decided to repower with a new engine. It wasn’t an easy decision. New outboards are pricey. The frugal guy in me had a hard time with the idea of putting an expensive engine on a hull (1987 Striper 16.2) that’s worth a lot less.
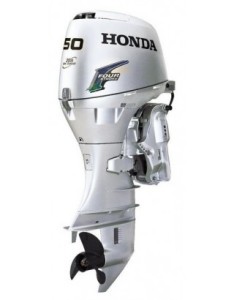
On the other hand was this:
So I started researching. For size I decided to stick with the 50 hp I currently have on the boat–50 moves it plenty fast for me and I want to keep the cost and weight down. Also important to determine with any engine you buy, new or used, is who is going to service it. You need someone who is knowledgeable, affordable, and won’t string you along. Which doesn’t sound like rocket science, but can be a lot harder to find than you’d think–especially in the middle of the boating season. You need to know this BEFORE trouble strikes. (As I learned the hard way with past engines.)
I compared features of Evinrude, Honda, Mercury, Suzuki, Tohatsu, and Yamaha. All seemed reliable. In the end I narrowed the choice to Honda and Tohatsu. These offered the best combination of weight and price. Also both were available from dealers close by with good reputations for service after the sale. Both priced out about $7800. That’s for the motor, wiring harness, controls and cables, fuel/water separator, prop, and installation. (For the same money the Tohatsu also included a tach and trim gauge.) Based on proximity and reputation, I decided to go with the Honda guy.
So that’s where I’m at. Installation is scheduled for the week after next. Can’t wait but in the meantime I have bottom-painting to do. I’ll fill in more of this article as it happen. Be interested to hear any advice/experience others have learned from repowering their Wahoo!s.
P.S. Regarding Tohatsu, a lot of interesting and seemingly contradictory information about them around. I’ve read and been told that Tohatsu manufactures Nissan outboards–that Nissans are just Tohatsus with a Nissan sticker. They also make a lot of smaller Mercury and Evinrudes (this from a Mercury dealer). On the other hand, this is the first year Tohatsu 4 strokes are available over 30 hp, and the Honda guy told me that it’s Honda that’s making the new, larger 4 stroke Tohatsus. The marine engine industry is a complicated business.
 Wahoo! owner Tom Brennan recently discovered a leak in the fuel tank of his 1989 Wahoo! 1850 Offshore. He’s in the process of replacing it and graciously offered to share his experience. Fuel tank leaks are a common issue in the Offshores, due to their below-deck location and the lack of below-deck air circulation.
So here it is, with lots of great info. Thanks Tom!
(Note: As of this writing (3/17/13), Tom wasn’t completely done with the project (e.g., he hadn’t replaced the deck), so it’s possible this article will get updated with new info.)
Also, for more below-deck and cutaway shots of an 1850, see these great restoration project photos by Joe Bernard.
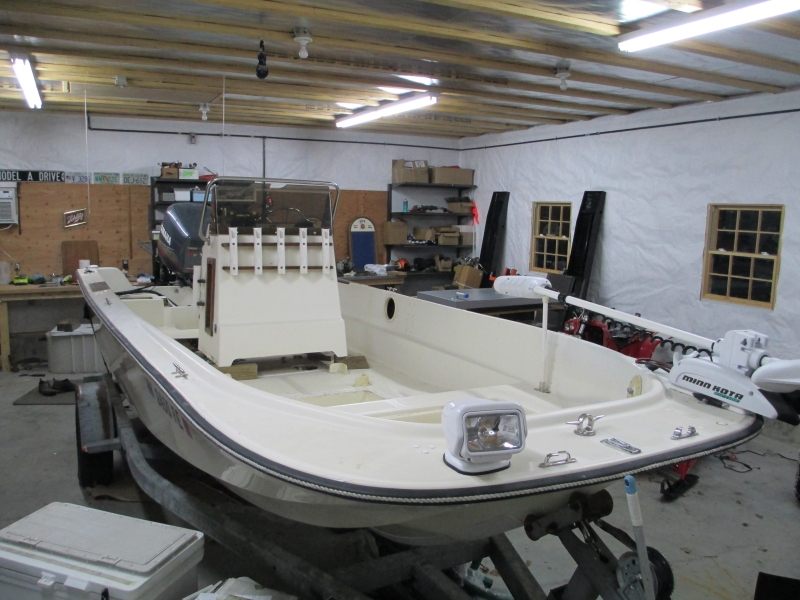
I live in southern New Hampshire. Prior to owning my Wahoo I had a 14 foot Mckee Craft (Whaler style) that I fished hard. But with three boys and big dreams, I needed a bigger boat. I happened to see an 18 foot Wahoo! Offshore. It was a mess but I knew the design would be perfect for me. So for over two months I hunted Craig’s List from Maine to Florida. Eventually I found a boat in West Virginia that looked promising, selling for just under six thousand dollars. I traveled solo non-stop to see it in person. It was in awesome shape, with a 2001 Yamaha Saltwater Series 150 that ran like new. The title identified it as a 1989 but contained no other information of note. I had it home by Sunday.
Not long after acquiring it I took it for a two week fishing trip on the Ottowa River in Canada. I ran it hard every day with no issues. Great trip–180 fish, 12 species. Wow (i reeled in 3). Returning home, I next took it out in Portsmouth Harbor where we banged around the ocean all day. Back home that evening as I was cleaning up my wife smelled gas. I opened the access ports and the smell was very strong. I knew right then I had a leak. I wouldn’t be taking my kids out in the boat until it was fixed. The tank had to come out.
Now when I bought the Wahoo! I knew it would need a new fuel tank eventually. I’ve changed tanks in a 33 Egg Harbor from that experience know that the constant to moisture over many years will eventually rot pin holes in aluminum (crevice corrosion). However, the way I replaced tanks in the Egg (the right way) is impossible in a Wahoo!.
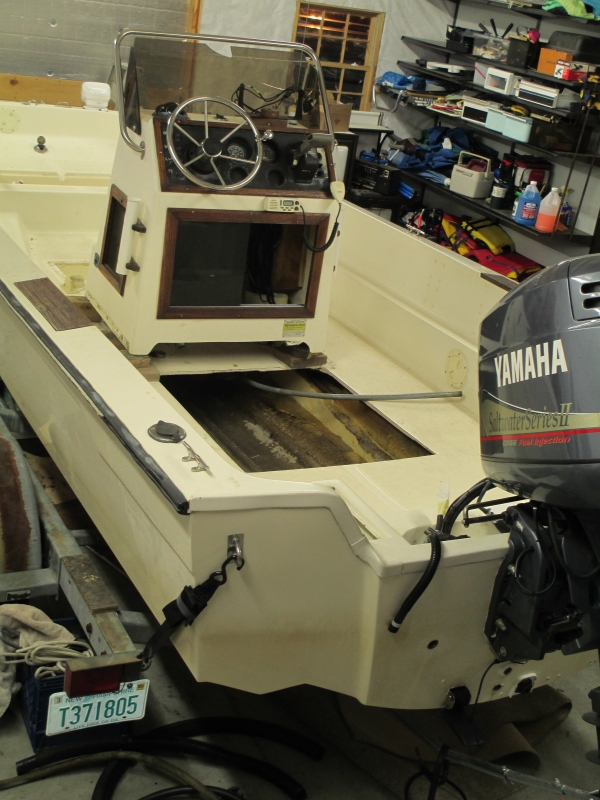
To replace the tank meant cutting it out of the deck. And the challenge there was figuring out the dimensions of the tank and where to cut. Before doing any cutting, of course, I got every last drop of gas out of the tank. I did not want to remove the whole center console, so I lifted and blocked it as high as the cables/wires would allow.
 The final cut  Another view |
Measuring through the access holes I was able to determine that the tank was 29 inches wide and the drain lines on the floor of the boat centered at 30 1/2 inches. So my first cut would be for width. I laid down tape on the deck and drew my cut lines on the tape. I decided to make the rear width cut first. I wanted it to be as far back as possible, about an inch short of the stringer. (I wanted it an inch shy of the stringer because I planned to later build a two inch ledge for the floor piece to sit back on.)
For the front width cut, I wanted to go as far forward as I could without cutting under the center console. That turned out to be 36 inches from my rear cut. So the dimensions of the opening would be 30.5 by 36 inches.
I made one plunge cut with a vibrating saw and did the rest of the cutting with a jigsaw. The cut didn’t need to be perfectly straight. I’d hoped that 36 inches would be a long enough hole to allow me to pull tank out. Unfortunately, it wasn’t. In the end I had to cut a section off the back of the tank to get it to come out. To put in the new tank, I’d either have to cut out more of the deck or go with a shorter tank.
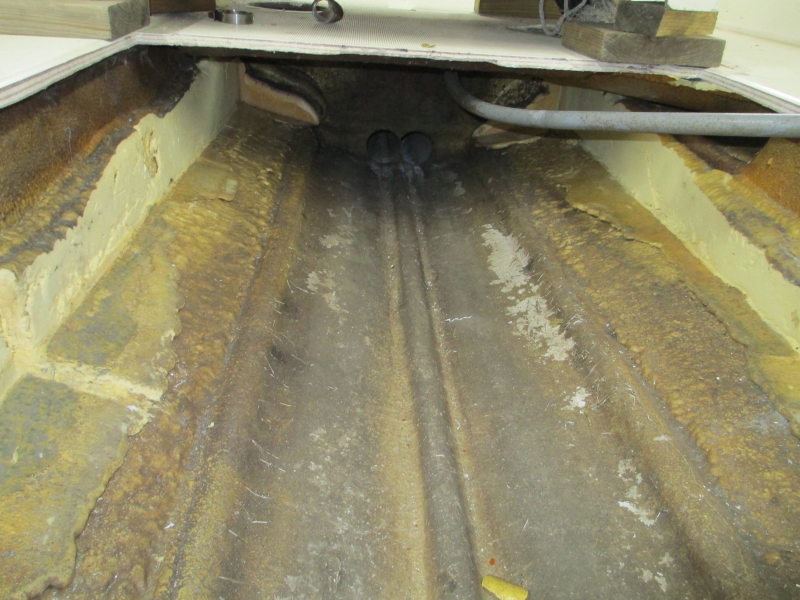 The fuel tank cavity: forward view  Rearward view |
After removing the tank I inspected it but could not find a leak. In fact, 99% of the tank looked in great shape. So I took it to a local metal shop. At first the repairman there couldn’t find one either but on closer inspection he said, “There it is,” and pointed to a light white ring of haze, rough in the middle., towards the front on the port side.
Later when I got home I looked at the tank cavity and found a dip in the foam that had trapped moisture (possibly from normal condensation) against the tank. Lack of air circulation below deck would have made it difficult for this moisture to dry out. The leak was high enough in the tank that it wasn’t until I took the boat on the ocean that wave action sloshed the gas high enough to reach it. Considering the way the tank is laid in the belly of these boats, foamed all the way down each side and corner, I’d guess such leaks are common over time.
The old tank was 45 gallons but I was willing to live with less.I preferred that to cutting more deck. So I had a new one made a bit shorter and shallower (its capacity is 36 gallons). I kept the width of the new tank 29 inches so it would fit between the stringers. I sanded down the foam on the sides and dry fit it in. It fit by a hair. So I sanded more to create some breathing room on the sides.Prior to installing the new tank I sanded, chemical etched, and painted it with four coats of Rust Bullet Industrial Coating. I plan on locking it in place with rows of 3M 5200.
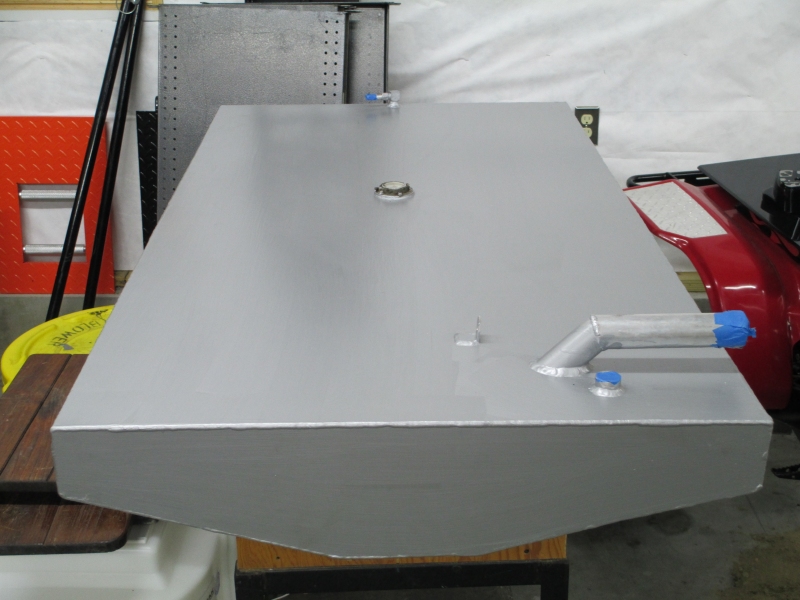
The new tank
To support the deck piece, I plan on building a two inch ledge of mahogany/aluminum plate on all four sides for it to sit on. Then I’ll attach it with countersunk screws and cover the screws and seam with 5200.
 These are notes to myself mostly and may be of little interest to visitors of the site. But then again you never know…
Finally got the boat in the water July 6, just in time for the Blessing of the Fleet the next day. The Blessing went great, a fun party with kids playing on the beach while the grownups downed barbeque and beer. Later in the evening there was a DJ doing 60s-friendly music and there was dancing on the docks. Only hitch was that the priest never showed up. So the 2012 Point of Pines Yacht Club is for the moment an unblessed fleet.
As with 2011 I was disappointed how at long it took me to get the boat in the water. But I did get a lot of work done including new bottom paint, a new fuel fill and hose, a number of patches to the fiberglass, raising the floors of the storage compartments, sorting through the wiring in the console, adding doel fins to the engine, relocating the fishfinder transducer, painting the console dashboard, painting the engine, repairing a broken section of the wiring/steering harness through-hull rigging tube, straightening a bent skeg, and refinishing all the wood. Not too shabby considering a lot of rainy weekends and that I was also planting two separate gardens, painting the garage, and going to my son’s little league games three times a week.
Remembering last year’s launch where a mile from the dock on my way to the yacht club I slammed into some rocks and dinged the prop pretty good, this year I looked at the maps more carefully and kept right to the channels. A nice, easy five mile run with no worries.
Some of the repairs/modifications I made before launching this year that seem to have actually improved things:
Stuff I either didn’t get to in the off-season or which needs fixing:
 The fuel fill on my Wahoo! (quite possibly the original) is shot. Actually a lot of the deck hardware could stand replacing, but the fuel fill in particular is cracked and broken. So I bought a replacement. To remove the original, I accessed and removed the hose clamps that secure it to the fuel fill hose via an access port on the port side. Problem is the fuel fill hose is more or less “melded” onto the fuel fill tube. So coming at it from a different direction, I removed the hose clamps that secure the fuel fill hose to the gas tank itself. But again, that hose connection wouldn’t budge, and no amount of twisting, pulling, or prying made any difference.
So it looks like I’m going to have to cut the hose off (using a box cutter or similar device). Which of course will ruin it, although I’m sure it’s best practice is to replace the hose any time you replace the fuel fill anyway. One last thing I’ll try before cutting is to apply some heat (e.g., wrap the hose in a towel that’s been dipped in boiling water). I’ll report back how that goes.
Added 6/9/12
Well. I finally got the old fuel fill line off. But it was not easy. In fact it was a bitch. I basically had to saw it off bit by bit with a sharp knife (a box cutter it turned out was too short handled to do the job). Cutting the hose through the small five inch entry port was hard enough, with me all the while wondering if metal against metal could cause enough spark to ignite fumes from the tank. But then to further complicate things it turned out that A) fuel fill lines include an embedded spiral of wire that you need to cut through, and, B) as my brother-in-law Russ had predicted, the material of the old fuel fill line had more or less melded over time onto the neck coming from the tank: meaning in fact there was no way I could ever have twisted it off. It had to be cut free. A brute force solution. And man did it fight to maintain that relationship, aided and encouraged by the embedded wire coil, down to the last quarter inch of line. With boats in salt water, nothing is easy. A dremel tool with a cutting wheel probably could have freed the hose in under a minute, but IMO it’d be just too easy to raise sparks or cut too deep.
Lessons Learned: Things I’ll know if and when I next replace a fuel fill:
1. Assume you’ll also have to replace the fuel fill hose, so order that as well.
2. The replacement fuel fill will probably not come with a gasket. So pick up one of those. Also, depending on the shape they’re in, you may want to replace the clamps that secure the fuel fill hose. Inspect everything before ordering your parts.
3. To remove the fill and hose (and assuming that removing the clamps and twisting the hose does not work), cut a vertical slice out of the hose where it covers the neck from the fuel tank. Use a good serrated knife or a small pistol grip saw. Be careful not to cut into the neck. then you can work the hose off. You may also need pliers to pull out pieces of embedded wire you cut exposes.
 The whole month of December without a single post! After a busy boating season I needed a little down time. But it’s time to get busy again. Been working on some bugs/enhancements to the gallery/upload pages and got most of it figured out yesterday while watching the NFL divisional round games (the Giants look like they’re peaking at just the right time…they’re going to be very tough).
Finally (finally!) in the first week of January got the boat tarp/cover fixed on in such a way that it won’t blow off in a high wind or cave in and pull loose after a heavy rain/snowfall. Up to this point I had the tarp tied with sash cord. But a good rain would load the top of the cover with water causing it to belly down into to boat. This in turn would stretch and loosen the sash cord, and then the next really wind day would just lift the whole thing off. I solved the bellying issue by cutting a bunch of wooden slats to the width of the boat and then laying them atop the gunnels (plywood would have worked too but I figured that’d be heavier and more awkward to put on and off). I solved the loosening problem by doing what you’re supposed to do…affixing the cover with heavy duty bungee cords.
The battery is still in the boat, instead of down in the basement on a trickle charger like it should be. I wanted the option of still being able to raise and lower the motor. But now that we’re into the truly frigid months here in Massachusetts it’s time to put it where it belongs.
Tasks for the month:
Shopping lists for boat/trailer parts and fishing equipment will have to wait until February.
 Winter haul out of the Seatoad went smoothly, thanks especially to my friend Dave who was in town for the weekend and helped out. Dave is a serious sailor…owns a 45 foot catamaran, the Luna Sea, which he and his lady Susan sail year round between Maine and the Caribbean. Dave is well-versed in all things nautical, including engines. In fact, when it comes to boats, I can say with confidence that Dave knows what he’s doing.
So I asked him about something I’ve been puzzling over recently …is there a real difference between the gear case oil they sell for cars (which goes for as cheap as $4 a quart) and the gear case oil they sell for outboards (which can go for as high as $9 for eight ounces–$36 a quart!). By gear case oil, I mean the lubricant that goes into your outboard’s lower unit. Depending on the brand it may be marketed as gear oil (or lube), lower unit oil (or lube), and a bunch of other names. (The various names, I suspect, are partly aimed at keeping you guessing.)
The standard viscosity for both auto and marine outboard gear case oil is the same…SAE 80W-90. So is there really a difference? Or is this just another case of boat owners getting ripped off?
Dave was refreshingly candid. Not missing a beat he said “Regular old gear oil is all I’ve ever used in my engines” (he has both outboards and inboards). “It’s the same stuff.”
But I’d heard that marine gear case oil was different: that it has additives to keep it low foaming–important to keep you from blowing a seal. And it’s tackier, so that any moisture finding its way into the unit can’t get between it and a metal surface, causing separation.
Dave shrugged. “Yeah, they might add a little anti-foaming agent, but a good oil shouldn’t be foaming anyway. Foaming is usually caused by water contamination not by some failure of the oil itself. And a lower unit is sealed. Keep the water out and you won’t have an issue. Get water in and no oil’s gonna make up for that.”
So after talking to Dave there was no way I was ever spending $9 for an eight ounce tube of Mercury Gear Lube again. But I also wasn’t quite ready to go with the very cheapest WalMart has to offer. So I compromised: Lucas Heavy Duty High Performance Gear Oil (Trans and Diff Lube), $8 a quart at Auto Zone. And to make me feel a little more comfortable with the choice, the back label states “Excellent for use in outboard final drives.”
Good enough for me. ![]()
A few loose notes…
 Even as I look for fair days to eke the last out of the fishing season here in Boston, I’m looking ahead to winter. And with a boat in a slip that means two things: haul out and winterizing.
“Haul out” is the day the boat needs to be gone from its slip. The Point of Pines Yacht Club has decreed that to be this Saturday. Given the screwy and limited access to usable boat ramps around here, haul out means first driving the trailer down to the Nahant Town Wharf, then hitching a ride over to the POPYC six miles away by car, and finally running the boat three miles across Broad Sound to the trailer. The many rocks and shoals between Point of Pines and Nahant make that journey a lot safer to undertake when the tide is high. Unfortunately this Saturday high tide is at 6 a.m. ![]()
Winterizing of course is the process of getting the boat ready for winter storage; basically six months of sitting. The goals of winterizing are pretty simple but worth listing out:
findre August 9, 2015
findre August 9, 2015
findre August 9, 2015
Lcolon7 June 23, 2015
MikeQ June 24, 2015