

A site dedicated to discussion of these classic boats
2 Nov, 2013 3 Comments
Filed in: bilge, plumbing, servicing
Wow, November already. The end of the boating season here in Boston. The weather’s been kind but for how much longer? An oddity–not a single hurricane came up the East Coast this year.
If you’re a regular visitor to the site you may have noticed the lack of posts this summer. Apologies. It was a frustrating season for me and my Wahoo!, although nothing to do with the hull itself. A series of engine problems coupled with a busy schedule kept the boat out of the water until August. The silver lining is that the extra time the boat spent sitting in the driveway let me tackle some maintenance tasks I’d been meaning to get to. Chief among those was finding and eliminating the leaks from the deck into the bilge. And I’m happy to say I got pretty damned close. So here’s a write-up.
Like many Wahoo! owners, I’ve been plagued by water–sometimes a lot of it–showing up in my bilge. The source of the water has been a mystery and a constant topic of speculation among Wahoo! owners. About the only things I knew for sure, because I keep my boat in a salt water slip and because the water in the bilge was always fresh, it that it was coming in from topside. Any time I hosed down the deck or we got a solid rain I could count on finding a few gallons of water below. Following a three day deluge several years back I must have pumped out at least 40 gallons…that’s 300 pounds of water!
As a quick fix, a couple years back I installed a small pump in the bilge. That gave me a way to get water out. But ultimately I wanted to stop it from getting down there in the first place. That meant a careful inspection to determine the possible sources of leaks, followed by a whole lot of patching and caulking.
Before getting on to the how-to part of the article, a few points about my Wahoo!. It’s a 1987 16.2 Striper. That’s a 16 foot (thereabouts) tri-hull center console. Several hings about it that may differ from your Wahoo! model:
Inspecting the boat, I didn’t see any single major source of water incursion. There wasn’t a big crack in the deck, a gaping hole, or anything like that. That suggested water was getting in from any number of smaller leaks: the decks drains, the rigging tube, access ports, screw holes, etc.. Going over the boat carefully and methodically and running some tests, here’s what I found:
Aside from visual inspection, here are some ideas on how to identify leaks:
- Start with a visual inspection of the flanges at the deck drain holes. Look for cracks, gaps, or a loose fit.
- To test the seal where the flange meets the deck: 1) I plugged the deck drain hole. 2) I poured about a gallon of water around it. 3) I observed it to see if the water went down.
- To test for a leak in the plumbing below deck: 1) I started with a dry bilge. 2) I pressed the end of a garden hose tight against the deck’s forward drain hole and then turned on the water and let it run for a minute or two. 3) I checked the bilge for water.
- An alternate way to test the plumbing below deck: 1) plug the outlet hole where the deck drain empties into the sump basin. 2) slowly pour water into the the deck drain end until it backs up, indicating the pipe is full. 3) Observe to see if the water in the pipe goes down.
- On one internet message board a poster suggested a test method that involved pumping smoke into the hull. It sounded too complicated to me, but it may be something you want to research.
Based on my inspection:
That was it. Leaving out the setting time for caulk and the fiberglass cloth, the entire project took maybe four to six hours spread over a couple of days. The only part that was a little bit hard was removing the rigging tube, since that required unhooking all of the cables and wires that run through it. Of course, if the tube had not needed repair but only recaulking I could have done that without taking it out. As it was, I used the opportunity to straighten out some of the wiring inside the console that had gotten messy over the years. If you do need to remove a rigging tube, take careful notes on all connections as you unhook them, what wire goes where. Taking pictures as you go is also a very good idea.
A good caulk tip…that I got from my friend Dave. When caulking a place where two surfaces meet (for example, where an access port meets the hull) let the caulk set awhile before tightening things down. That allows the caulk to form a better gasket, whereas tightening down immediately tends to just squeeze most of it out.
After finishing my repairs (and after all caulk had had a chance to set completely) it was time to test the results. Starting with a an empty bilge I hosed the deck and cockpit down for a solid five minutes. I sprayed in about 35 gallons of water, making sure I got it everywhere on the deck and sides. Prior to the repair work a hosing like that would have put at least two gallons of water in the bilge. And after? The results exceeded my wildest hopes.Turning on the bilge pump all that came out was about one cup.
In the months since then it’s rained a fair amount and I’ve hosed down the deck many times. Still no water below. The “mystery” of water in the bilge turned out to be a simple one with a simple solution. So if water below has been an issue for you, rest assured that it’s likely an easy fix, not to mention a great winter project for your Wahoo!
Addendum 11/6/14
Pulled the boat from the water today and parked it in it’s winter slip (a.k.a., my driveway). I powerwashed the deck for a solid ten minutes and no water showed up in the bilge. Amazing.
17 May, 2012 No Comments
Filed in: plumbing
My Wahoo! Striper 16.2 has four built-in compartments: an anchor storage in the bow, a combination cooler/seat located in front on the center console, and two compartments in either corner of the stern, typically used to store the battery and fuel/water separator (also sometimes used as a live well).
All of these compartments include a drain hole to allow any water that gets into them to drain out. But with the exception of the anchor storage, instead of the drain hole being located in the compartment floor, it’s located on a side wall, with the lower lip of the drain hole one inch off of the compartment floor. This means that when water gets in the last inch of it has no means of escape. It sits there, eventually getting slimy and gross. In winter, if it gets cold enough where you live, it freezes, the expanding ice potentially putting pressure on the compartment seams. Not good design.
At this point drilling holes in the floors of these compartments is no solution as it would have them draining into the bilge, something I do not want. So the best option I can figure is to displace that last inch of water by putting in inserts that in effect raise the floor of the compartments. It has to be something that is durable, won’t rust, rot, or absorb water, float, or cause discoloration. Some possibilities:
Any other ideas?
Addendum 5/17/2012: Curiouser and curiouser. While (as I mentioned) the forward anchor compartment’s drain hole is in the floor, the tube that eventually sends water from that compartment onto the deck is actually situated four inches HIGHER than the drain hole. So the last four inches of water in the anchor compartment will not drain on its own (unless the boat is underway with its nose up). I don’t get it.
Addendum 7/6/2012: I finally came up with a solution to my standing water issues: Eva Foam. Eva foam is a pretty widely used closed cell foam that comes in a variety of thicknesses and colors. It’s used for all kinds of things from craft foam to exercise and sleeping mats to padding in shoes and other sports gear. Odds are you already own plenty of stuff containing Eva Foam. The particular foam I bought I came across in Home Depot…a four pack of 2.5 by 2.5 foot 1/3 inch interlocking sheets being sold as a kids play mat. It went for $15. Each of the four sheets was a different color but I didn’t care too much about that…they’re going to sit out of sight at the bottom of my Wahoo!’s storage compartments. Also possibly I could have found foam even cheaper somewhere else, but $15 was good enough for me.
What is good about Eva Foam is that it is almost weightless, fairly impervious to breakdown by immersion to water and mold, is durable, won’t rust or rot, is easy to cut to shape, and won’t leach color. Almost perfect for how I wanted to use it except for one thing…it floats. And how can something that floats displace water? Short answer, it can’t. Not unless something holds it in place to prevent it from floating. Like the anchor in my anchor compartment. The battery in my battery compartment. The fuel/water separator in my fuel/water separator compartment. By happy coincidence, I realized that three of the four storage compartments in my boat already contained a built in mechanism to hold the foam in place. That left only the cooler compartment, but I’ll think of something to toss in there to ensure the foam is held down. I guess as a last resort I could use an adhesive like 3M 4200 to glue the foam to the floor, but I”m sure there are less permanent solutions.
Note that unless you’re a wiz at measuring and cutting (which I’m not) it will be diffficult to create any false floor for your Wahoo1 compartments that completely eliminates room for standing water. Still, for the four compartments my 1987 Striper 16.2 has, I calculated that without alteration the compartments collectively allowed about two gallons of standing water to remain. And after fitting them with Eva Foam I think I’ve got that amount down to under one quart, a 90% reduction. I’ll take it for now.
1 Apr, 2012 7 Comments
Filed in: bilge, plumbing, reference
As a companion piece to the post on the Wahoo!s above-deck drain system, here’s one on the Wahoo!’s below-deck plumbing. Like the self-bailing deck, the Wahoo! hull interior is one of the most confusing features of these boats. As with the post on the deck drain system, I’ll update this article if and when new info becomes available. Note also that this post deals specifically with smaller Wahoo!s–the tri-hull models. For all I know the larger Wahoo!s (say, those over 21 feet) and/or the V hulls had a very different design. So your mileage may vary.
Basic to understanding the design of a Wahoo! is knowing what’s going on insider the hull. Some key points:
Wahoo! hulls contain foam. This helps with buoyancy of course. Boston Whaler hulls are foam “filled.” The “filled” part means every bit of the hull interior is filled with sprayed-in foam. This not only maximizes buoyancy, it also in theory keeps water out of the hull because there’s no literally place for it to collect. But there are a few potential drawbacks to this design. For one, because there is the assumption of no water ever entering the hull, Whaler hulls do not have a drain plug. That means if somehow water DOES manage to get in there, there’s no easy way to get it out. A second concern is that over time the hull foam may begin to absorb water, not unlike a sponge. The water could come from the outside or it could come from condensation inside the hull. Either way, as the foam absorbs water it takes on weight. That causes handling problems. And over time the moisture can cause the foam to break down.
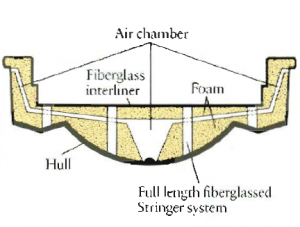
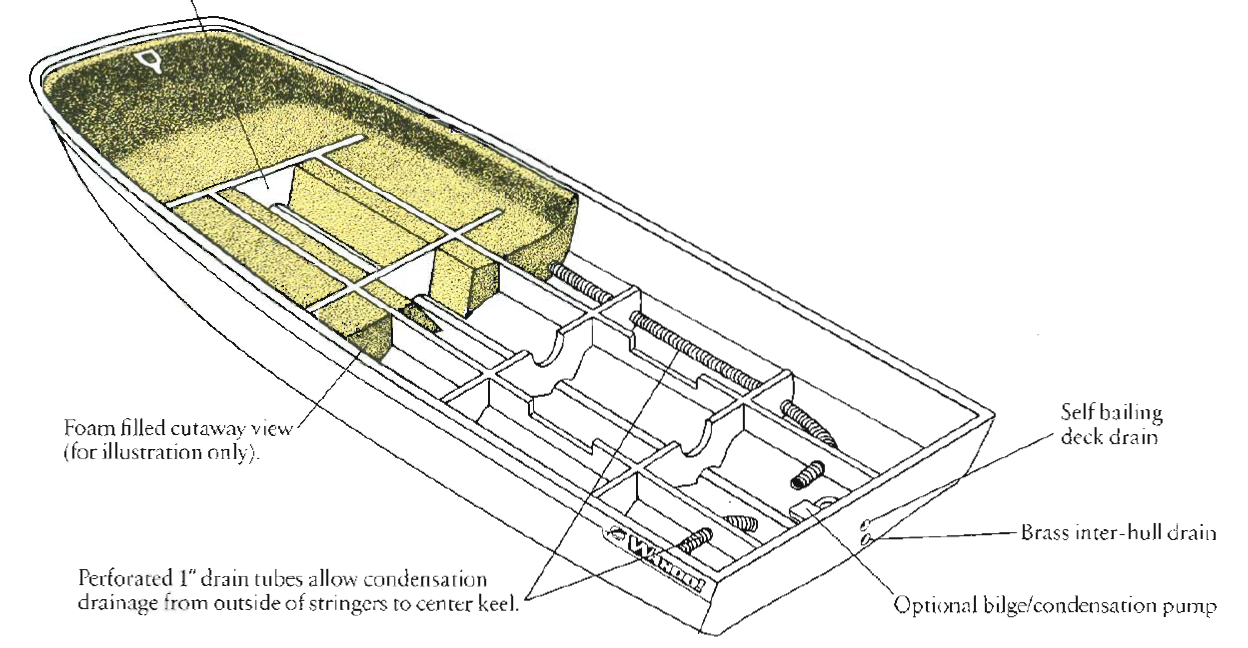
Distinct from Whalers, Wahoo! hulls are foam “lined.” The “lined” part means that the top, sides, and bottom of the hull interior are coated with blown-in foam but there is an air cavity in between. Also the Wahoo! hull includes a drain hole in the stern. The advantage of this design is that the cavity allows the interior foam and stringers to “breathe”; that is, the ability to dry. And any water that does get into the hull can be drained. The downside, compared to the Whaler design, is that with less foam comes less buoyancy, and the air cavity allows water a place to collect.
 Cutaway showing Wahoo! foam liner and air cavity. Cutaway showing Wahoo! foam liner and air cavity. |
The original Wahoo!s from the mid 80s design did not include a bilge pump. Since that time 25 years’ worth of Wahoo! owners have wondered why, because water certainly finds its way into Wahoo! bilges, as it does with any other boat. It’s not immediately clear what the the absence of a pump meant from the manufacturer’s perspective. Maybe it meant the company had a misplaced faith that water wouldn’t get into the bilge. Or maybe it meant they assumed that most Wahoo!s would be used as trailer boats whose drain plugs would be opened after every use. Or maybe it was simply an attempt by the company to cut costs and leave it to customers to add their own bilge pumps. Whatever was behind the initial decision to omit a pump, it was not adequate. Within a several years Wahoo! brochures began mentioning an “optional” bilge pump.

So does your Wahoo! need a pump in the bilge? First, let’s talk about the ways that water can get into the bilge. Leaving aside leaks in the hull exterior (but all the more reason for a bilge pump), you have:
These things together or alone can allow quite a bit of water into you hull. Water is especially good at finding its way in when its got some force behind it, such as wind-driven rain or when you’re hosing the deck. Given the relatively small size and weight capacity of Wahoo!s, and that a gallon of water weighs seven pounds, it doesn’t take much to affect performance.
So to the question of whether your Wahoo! needs a pump in the bilge, I say the answer is, yes, absolutely. Even if you keep your boat on a trailer, the added safety and security that a bilge pump gives you make it well worth it. The installation is easy and inexpensive. I would not waste time considering a manual pump–put in an electric one and be done with it.
Locate the pump in the spot shown in the diagram above, at the rear of the bilge along the keel. This is the lowest section of the hull and where all water will run to. Most Wahoo! tri-hulls come with a five inch access port in the center of the stern through which you can install the pump. If yours does not include an access port you’ll need to add one.
Here are a few notes on the pump I installed in case it’s helpful to anyone. There are certainly other ways to do it.
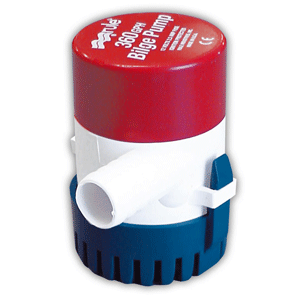
 Rule 360 bilge pump. Rule 360 bilge pump. |
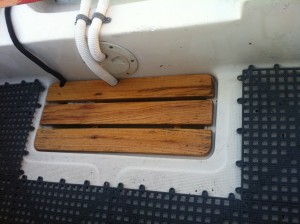
 Hose from bilge pump exists through hole in access port cover and drains into splashwell.. Hose from bilge pump exists through hole in access port cover and drains into splashwell.. |
Just as I was finishing this post I wondered whether anyone had ever configured his Wahoo! so that a single pump handled both the above and below deck drainage. You could achieve this pretty simply by installing a pump in the bilge and then drilling about a one inch hole in the bottom of the deck sump basin. That would dump all water that enteredd the boat into the bilge. It seems like a bad idea for a few different reasons, but man if anyone has ever tried it I’d love to hear how it went.
Here’s a little more reading on the subject:
http://www.thehulltruth.com/boating-forum/96775-16-wahoo-water-hull.html
(Note: in this message thread Monstawhala states that the top hole in the deck sump basin drains into the bilge, and that both stern compartments also drain directly into the bilge. That is not correct. The stern compartments drain into the sump basin via the aforementioned top hole in the sump basin.)
20 Feb, 2012 14 Comments
Filed in: bilge, plumbing, reference, scupper
There are two things I’d planned to write about this winter: the Wahoo!’s above deck drain system and the Wahoo!’s below deck drain system. Both are among the quirkiest aspects of these boats and among most commented on/asked about. They sure had me stumped when I first bought my Wahoo! It’s the third week in February all of a sudden and Spring is just around the corner. So time to get writing before the boating and fishing season take over.
This post will be about the Wahoo!’s above-deck drain system. Specifically it will be about the self-bailing deck drain system employed by most smaller Wahoo!s, whereby water from the deck is designed to exit out of a scupper in the stern. I may not get all the facts complete or correct the first time. So if you are are a Wahoo! owner past or present and have corrections or additional info, please add a comment or send an email. I’ll continue to update this article as necessary.
Smaller Wahoo!s have a deck draining system that is designed to be self-bailing. The idea is that, when underway, any water that accumulates on the deck, be it from rain, spray, waves over the gunnels, or whatever, is designed to run to the rear of the boat and collect in a small sump basin located just inside the stern. A scupper connects the basin to the outside of the boat. Gravity from the boat’s forward motion forces water from the sump basin through the scupper and out of the boat. (Note that it is only the Wahoo!’s deck only that is designed to be self-bailing, not the hull interior (that is, the bilge).) Continue Reading…
11 Oct, 2011 No Comments
 It rained the other night in Boston. Or said another way…it RAINED the other night in Boston. Six inches in two hours! At times the rain was so loud it sounded like a freight train. I lay in bed listening and smiling, thinking of my Wahoo! in its slip, warmed by the thought of the two bilge pumps I’d installed this past year (one in the deck drain basin and one in the true bilge), doing their job. No worries.
Until I remembered that the day before I’d taken the battery out of the boat and brought it home to charge it. Shoot.
It being a weekday, I had to go to work that morning and couldn’t check on the boat until later. All day I wondered if I’d find it full of water up to the gunnels or worse. It wasn’t though. I walked out onto the dock that evening to find it bobbing in its slip. Well not bobbing, exactly. Actually the stern was sitting pretty low in the water. I hooked up the battery and the pumps went to work, removing about 100 gallons of water, most of it from below deck.
Once the season is over and I have more time I’ll write a lot more about the Wahoo!s plumbing…the supposedly self-bailing system, the deck drain, the true bilge, what drains into where and so on. It’s one of the most confusing aspects of these boats and one of the most asked about by Wahoo! owners. For now, though, I’ll just say that in my (limited) experience: A) If you keep your Wahoo! in the water you most definitely need a bilge pump, and quite likely two; B) Even if you don’t keep it in the water you may prefer a pump in the deck drain basin to Wahoo!s self-bailing design; and C) Rule pumps…ummm….rule. They are rugged, dependable workhorses. And made right here in the great state of Massachusetts. ![]()
findre August 9, 2015
findre August 9, 2015
findre August 9, 2015
Lcolon7 June 23, 2015
MikeQ June 24, 2015